Spring + MVC
MVC 패턴이란?
: 어플리케이션의 확장을 위해 Model, View, Controller 세가지 영역으로 분리한것으로, 컴포넌트의 변경이 다른영역 컴포넌트에 영향을 미치지 않아 유지보수에 용이하다. 또한, 컴포넌트간의 결합성이 낮아 프로그램 수정이 용이하다.
자세한 내용은 아래 링크에 정리해 놓았다.
https://java-is-happy-things.tistory.com/24?category=1266184
MVC Pattern 이해하기
MVC Pattern (Model-View-Controller) MVC패턴이란 MVC 는 Model, View, Controller의 약자로, 프로젝트를 구성할 때 그 구성요소를 세가지의 역할로 구분한 패턴이다. Model : Logic(Business & DB)을 처리하기..
java-is-happy-things.tistory.com
Spring MVC
: 스프링은 DI나 AOP와 같은 기능뿐만 아니라 서블릿 기반의 WEB개발을 위한 MVC Framework를 제공한다.
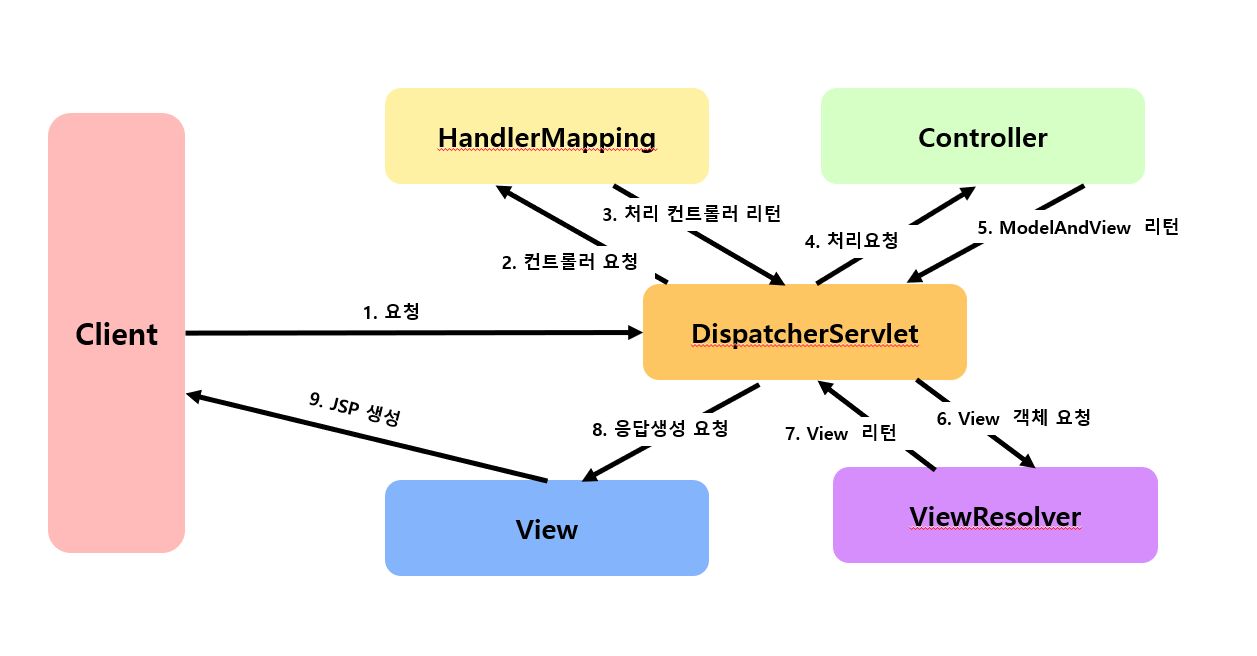
Spring MVC 구성요소
| 구성요소 | 설명 |
| DispatcherServlet (Front Controller) |
모든 클라이언트의 요청을 전달받으며, Controller에게 클라이언트의 요청을 전달하고 Controller가 리턴한 결과값을 View에게 전달하여 알맞은 응답을 생성 |
| HandlerMapping | 클라이언트의 요청 URL을 어떤 Cotroller가 처리할지 결정 URL 과 요청정보를 기준으로 어떤 핸들러 객체를 사용할지 결정하는 객체이며, DispatcherServlet은 하나 이상의 핸들러 매칭을 가질 수 있음 |
| Controller | 클라이언트의 요청을 처리한 뒤 Model을 호출하고 그 결과는 DispatcherServlet에 리턴 |
| ModelAndView | Controller가 처리한 데이터 및 화면에 대한 정보를 보유한 객체 |
| ViewResolver | Controller가 리턴한 뷰 이름을 기반으로 Controller의 처리 결과를 보여줄 View를 결정 |
| View | Controller의 처리결과를 보여줄 응답화면을 생성 |
Spring MVC 실행순서
- DispatcherServlet이 요청을 수신
- DispatcherServlet은 HandlerMapping에 어느 Controller를 사용할 것인지 문의
- Controller는 ModelAndView 객체에 수행결과를 포함하여 DispatcherServlet에 리턴
- View는 결과정보를 사용하여 화면 표현

SpringMVC 구현
- web.xml에 DispatcherServlet 등록 및 Spring 설정파일(root-context.xml, servlet-context.xml) 등록
- 설정파일에 HandlerMapping설정
- Controller 구현 및 Context 설정파일(servlet-context.xml)에 등록
- Controller와 JSP 연결을 위해 ViewResolver설정
- JSP코드 작성

Spring Framework기반 사용자정보 관리 애플리케이션
사용자 정보를 등록하고 확인하는 기능
요구사항
- Spring DI 예제에서 사용했던 프로젝트를 SpringMVC패턴을 적용한다.
- Spring 설정파일(root-context.xml, servlet-context.xml)을 구현하고, web.xml에 등록한다.
- Controller 클래스를 구현한다.
- View( index.jsp / regist.jsp / regist_result.jsp)를 구현한다.
web.xml
<?xml version="1.0" encoding="UTF-8"?>
<web-app version="2.5" xmlns="http://java.sun.com/xml/ns/javaee"
	xmlns:xsi="http://www.w3.org/2001/XMLSchema-instance"
	xsi:schemaLocation="http://java.sun.com/xml/ns/javaee https://java.sun.com/xml/ns/javaee/web-app_2_5.xsd">

	<!-- The definition of the Root Spring Container shared by all Servlets
		and Filters -->
	<context-param>
		<param-name>contextConfigLocation</param-name>
		<param-value>/WEB-INF/spring/root-context.xml</param-value>
	</context-param>

	<!-- Creates the Spring Container shared by all Servlets and Filters -->
	<listener>
		<listener-class>org.springframework.web.context.ContextLoaderListener</listener-class>
	</listener>

	<!-- Processes application requests -->
	<servlet>
		<servlet-name>appServlet</servlet-name>
		<servlet-class>org.springframework.web.servlet.DispatcherServlet</servlet-class>
		<init-param>
			<param-name>contextConfigLocation</param-name>
			<param-value>/WEB-INF/spring/appServlet/servlet-context.xml</param-value>
		</init-param>
		<load-on-startup>1</load-on-startup>
	</servlet>

	<servlet-mapping>
		<servlet-name>appServlet</servlet-name>
		<url-pattern>/</url-pattern>
	</servlet-mapping>

</web-app>
root-context.xml
<?xml version="1.0" encoding="UTF-8"?>
<beans xmlns="http://www.springframework.org/schema/beans"
	xmlns:xsi="http://www.w3.org/2001/XMLSchema-instance"
	xmlns:context="http://www.springframework.org/schema/context"
	xmlns:aop="http://www.springframework.org/schema/aop"
	xsi:schemaLocation="http://www.springframework.org/schema/beans https://www.springframework.org/schema/beans/spring-beans.xsd
		http://www.springframework.org/schema/context http://www.springframework.org/schema/context/spring-context-4.3.xsd
		http://www.springframework.org/schema/aop http://www.springframework.org/schema/aop/spring-aop-4.3.xsd">

	<!-- Root Context: defines shared resources visible to all other web components -->
<context:component-scan base-package="com.ssafy.hw.model"></context:component-scan>
</beans>
servlet-context.xml
<?xml version="1.0" encoding="UTF-8"?>
<beans:beans xmlns="http://www.springframework.org/schema/mvc"
	xmlns:xsi="http://www.w3.org/2001/XMLSchema-instance"
	xmlns:beans="http://www.springframework.org/schema/beans"
	xmlns:context="http://www.springframework.org/schema/context"
	xsi:schemaLocation="http://www.springframework.org/schema/mvc https://www.springframework.org/schema/mvc/spring-mvc.xsd
		http://www.springframework.org/schema/beans https://www.springframework.org/schema/beans/spring-beans.xsd
		http://www.springframework.org/schema/context https://www.springframework.org/schema/context/spring-context.xsd">

	<!-- DispatcherServlet Context: defines this servlet's request-processing infrastructure -->

	<!-- Enables the Spring MVC @Controller programming model -->
	<annotation-driven />

	<!-- Handles HTTP GET requests for /resources/** by efficiently serving up static resources in the ${webappRoot}/resources directory -->
	<resources mapping="/resources/**" location="/resources/" />

	<!-- Resolves views selected for rendering by @Controllers to .jsp resources in the /WEB-INF/views directory -->
	<beans:bean class="org.springframework.web.servlet.view.InternalResourceViewResolver">
		<beans:property name="prefix" value="/WEB-INF/views/" />
		<beans:property name="suffix" value=".jsp" />
	</beans:bean>

	<!-- controller 위치 스캔 -->
	<context:component-scan base-package="com.ssafy.hw.controller" />


</beans:beans>
UserController.java
package com.ssafy.hw.controller;

import org.springframework.stereotype.Controller;
import org.springframework.web.bind.annotation.GetMapping;
import org.springframework.web.bind.annotation.PostMapping;
import org.springframework.web.servlet.ModelAndView;

import com.ssafy.hw.dto.User;

// 이 클래스가 컨트롤러 임을 어노테이션으로 설정, 컴포넌트 스캔을 통해 빈으로 등록
@Controller
public class UserController {

	/**
	 * '/' 또는 '/index' 요청이 get 방식으로 들어왔을 때 index로 연결한다.
	 */
	@GetMapping({"/","/index" })
	public String showIndex() {
		return "index";
	}

	/**
	 * '/regist' 요청이 get 방식으로 들어왔을 때 regist로 연결한다.
	 */
	@GetMapping("/regist")
	public String showRegistForm() {
		return "regist";
	}

	/**
	 * '/regist' 요청이 post 방식으로 들어왔을 때 전달된 User 객체를 regist_result로 연결한다.
	 */
	@PostMapping("/regist")
	public ModelAndView doRegist(User user) {
		ModelAndView mav = new ModelAndView();
		// 어디로 연결할지 설정
		mav.setViewName("regist_result");
		// 전달할 객체
		mav.addObject("user", user);
		return mav;
	}
}
index.jsp
<%@ page language="java" contentType="text/html; charset=UTF-8"
	pageEncoding="UTF-8"%>
<!DOCTYPE html>
<html>
<head>
<meta charset="UTF-8">
<title>SSAFY 사용자 관리</title>
</head>
<body>
	<div class="container">
		<h1>사용자 관리</h1>
		<hr>
		<ul>
			<li><a href="./regist">사용자 등록</a>
		</ul>
	</div>
</body>
</html>
regist.jsp
<%@ page language="java" contentType="text/html; charset=UTF-8"%>
<!DOCTYPE html>
<html>
<head>
<meta charset="UTF-8">
<title>SSAFY 사용자 관리</title>
<style>
	label{
		display: inline-block;
		width: 80px;
	}
	textarea {
	width: 100%;
}
</style>
</head>
<body>
	<h1>SSAFY 사용자 관리</h1>
	<form method="post" action="regist">
		<fieldset>
		<legend>사용자 정보 입력</legend>
		<label for="id">아이디</label>
		<input type="text" id="id" name="id"><br>
		<label for="password">비밀번호</label>
		<input type="password" id="password" name="password"><br>
		<label for="name">이름</label>
		<input type="text" id="name" name="name"><br>
		<label for="email">이메일</label>
		<input type="email" id="email" name="email"><br>
		<label for="age">나이</label>
		<input type="number" id="age" name="age"><br>
		<input type="submit" value="등록">
		<input type="reset" value="초기화">
		</fieldset>
	</form>
</body>
</html>
regist_result.jsp
<%@ page language="java" contentType="text/html; charset=UTF-8"%>
<!DOCTYPE html>
<html>
<head>
<meta charset="UTF-8">
<title>사용자 등록 결과</title>
<style>
table {
	border-collapse: collapse;
	width: 100%;
}

th, td {
	border: 1px solid black;
}

th:nth-child(1) {
	width: 100px;
}
</style>
</head>
<body>
	<h1>사용자 등록 결과</h1>
	<h2>등록 사용자 정보</h2>
	<table>
		<thead>
			<tr>
				<th>항목</th>
				<th>내용</th>
			</tr>
		</thead>
		<tbody>
			<tr>
				<td>아이디</td>
				<td>${user.id}</td>
			</tr>
			<tr>
				<td>비밀번호</td>
				<td>${user.password}</td>
			</tr>
			<tr>
				<td>이름</td>
				<td>${user.name}</td>
			</tr>
			<tr>
				<td>이메일</td>
				<td>${user.email}</td>
			</tr>
			<tr>
				<td>나이</td>
				<td>${user.age}</td>
			</tr>
		</tbody>
	</table>
	<!-- 다시 사용자를 등록할 수 있는 링크를 제공한다. -->
	<a href="./regist">추가등록</a>
</body>
</html>
실행결과
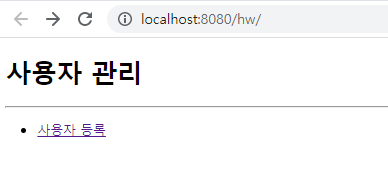
초기화면: 사용자등록를 클릭하여 사용자등록화면으로 넘어간다.

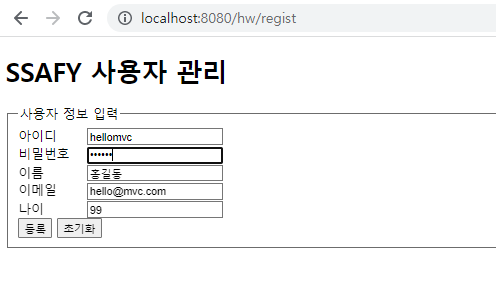
등록화면 : 사용자 정보를 입력 후 등록을 진행한다.
초기화 버튼 클릭 시 모든 칸이 초기화된다.

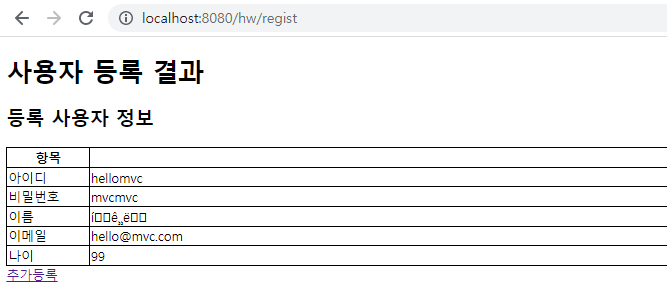
확인화면 : 등록한 사용자 정보를 확인할 수 있는 화면이다.
추가등록 버튼을 통해 새로 추가할 수 있다.
현재는 filter설정을 하지 않아 한글이 깨져나온다. 다음포스팅에서 filter설정을 알아보자.

프로젝트 구조

'WEB > Spring' 카테고리의 다른 글
| [Spring] Spring FileUpload + 예제 실습 (0) | 2022.04.24 |
|---|---|
| [Spring] Spring Interceptor /Filter + 예제 실습 (0) | 2022.04.24 |
| [Spring] Spring AOP + 예제 실습 (0) | 2022.04.24 |
| [Spring] Spring DI + 예제 실습 (0) | 2022.04.16 |
| [Spring] Spring이란 (0) | 2022.04.16 |


댓글